
With the recent outbreak of COVID-19, I have had several patients reach out to me for urgent foot care in order to avoid visiting the hospital for treatment. Although non-essential services have been postponed for our profession, I wanted to make sure that I could provide urgent and emergency foot care to my patients in the safest possible environment.
On top of the extra precautions that must be taken at this time, I decided to build a sneeze guard after being inspired by some of my colleagues who had built sneeze guards at their own clinics. The goal here was to simply to provide as much physical separation between the patient and myself in order to make patients as comfortable as possible when seeing me. From the patient’s perspective, it can be a bit scary to see me in full PPE in comparison to what they were used to before.
I am sharing my experience of building this guard/barrier in the case it may inspire you, or other healthcare providers, to do something similar. This is not intended to be a perfect solution. It is one additional step I took to provide a safe and comfortable environment for my patients during this time.
Starting Point
In order to make this sneeze guard happen, I had to re-arranged my treatment room in order to create space for two separate zones – one for the patient and one for me to practice in.
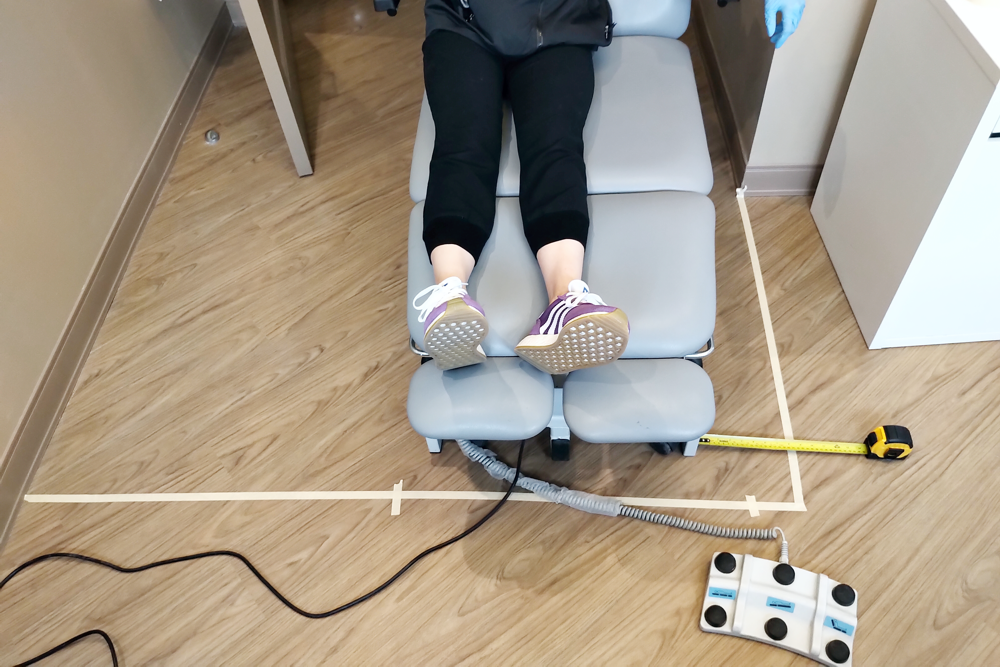
The best starting point would be to measure your space, and decide where things should go. You will need to be as detailed as possible, this will prevent potential issues down the road. I was measuring everything down to the 1/4 inch, and as a result didn’t run into any material shortages or larger problems. I also went to the clinic, put masking tape on the floor, and made sure I could visualize what I wanted before buying anything.
One of the trickiest parts was deciding how high the opening needed to be for the feet. Make sure you give yourself enough height for treating issues on the heel as an example.
Once I had the idea in mind, I sketched everything out and decided on the materials that would be needed.
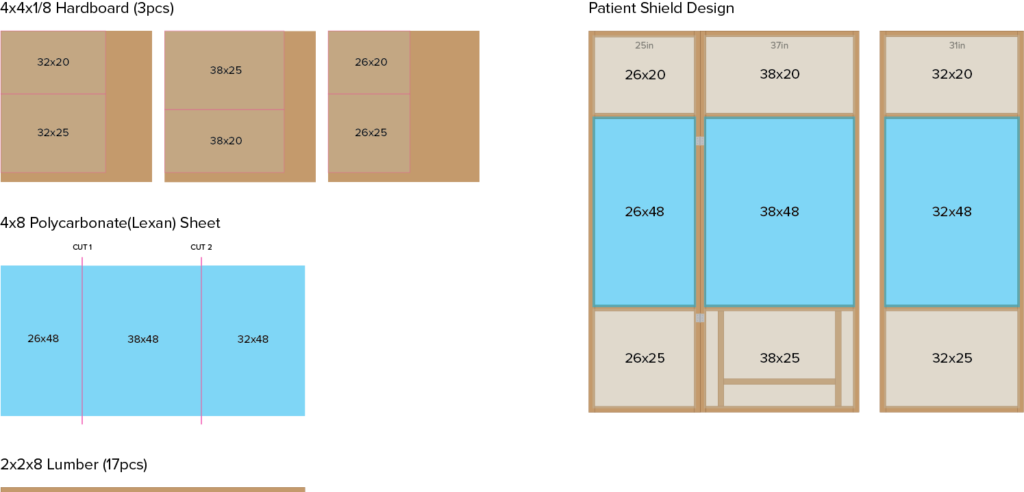
For the clear windows, I decided that I would get one 4x8x1/8 sheet of polycarbonate plastic and have it cut since this provided the most value per dollar. It is important to note that polycarbonate (Lexan) is considerably more durable than acrylic, and can be disinfected with common clinical disinfectants, such as isopropyl alcohol. If you are to do something similar, I was told that polycarbonate is the better way to go.
For any remaining opening that would exist, I decided to use 1/8th thick hardboard as it was cheap and light.
Once I knew the materials I was working with, I used their measurements to create my master plan. It is important to note that a 2×2 piece of wood is actually closer to 1.5in x1.5in, I learned this the hard way and later had to re-do my plan a bit.
I would emphasize ordering extra 2x2x8 lumber as some of the pieces can be extremely warped and may be un-usable. When I built my barrier, you couldn’t pick out your own wood and it had to be picked up curbside at the local home hardware store. For this reason, I ordered more lumber than needed – and as anticipated I got 3 bad pieces in the bunch.
Tools & Materials
The materials used in this project can all be bought at any major home hardware store. Home Depot was the closest option for me. I had to place the order online and pick it up once it was ready, the process was actually really simple and quick. The polycarbonate sheet is best sourced from a local plastics company that will cut it for you.
List of Materials:
2x2x8 Lumber (17pcs)
4×4 Hardboard Sheet (3pcs)
2in Door Hinge (2pcs)
4×8 Sheet of Polycarbonate (Lexan)
1 1/4in Pocket Hole Screws (30pcs)
1/2in Wood Screws (32pcs)
3/4in Finishing Nails (50pcs)
Glossy Trim Paint
Foam Paint Roller Kit
The tools used in this project are ones I happened to have access to but are not essential. Since there aren’t too many cuts required, you may be able to get away with a simple hand saw and a drill. Having the power tools will help save time and make things look more professional. Home Depot has the option to rent tools so you may go that route and rent the tools for a day.
List of Tools:
Drill
Mitre Saw
Jig Saw
Krug Pocket Hole Jig
Measuring Tape
Adjustable Clamp
Hammer
Utility Knife
Safety Glasses
Gloves
Pencil
Building the Frames
The hardest part of this entire project was measuring out the frames and knowing exactly what sizes the pieces needed to be. Once I knew the sizes, it was pretty easy to make all of the cuts. The height of every frame was 8ft so all I needed to cut were the middle pieces for each frame. There were 4 middle pieces for each frame.
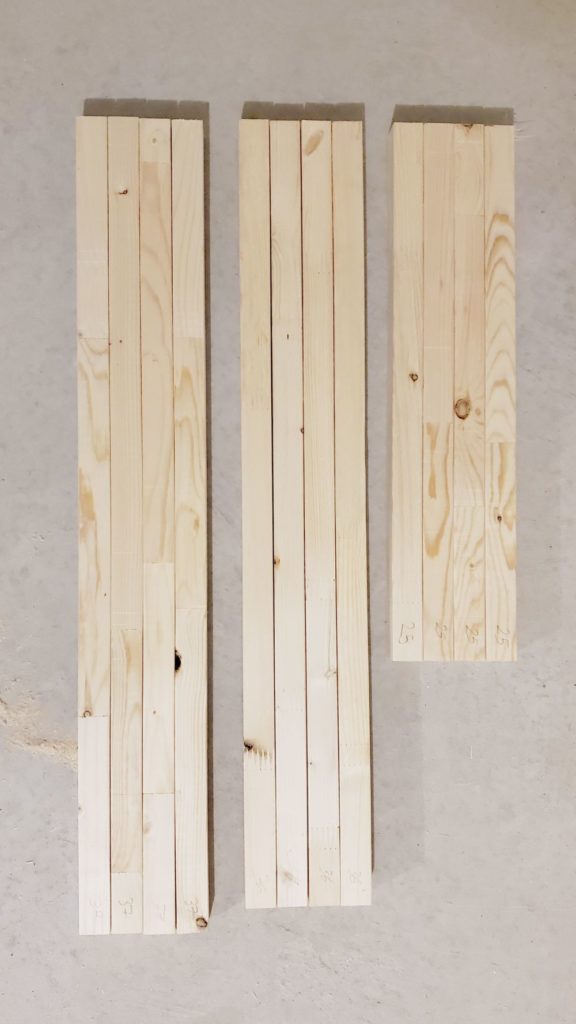
1. Cutting the wood to size 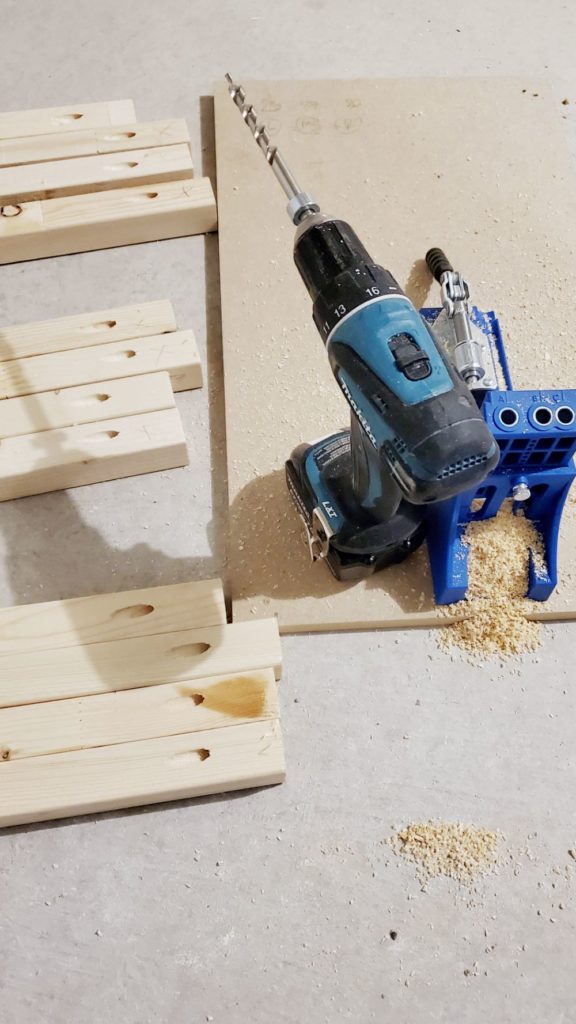
2. Drilling pocket holes 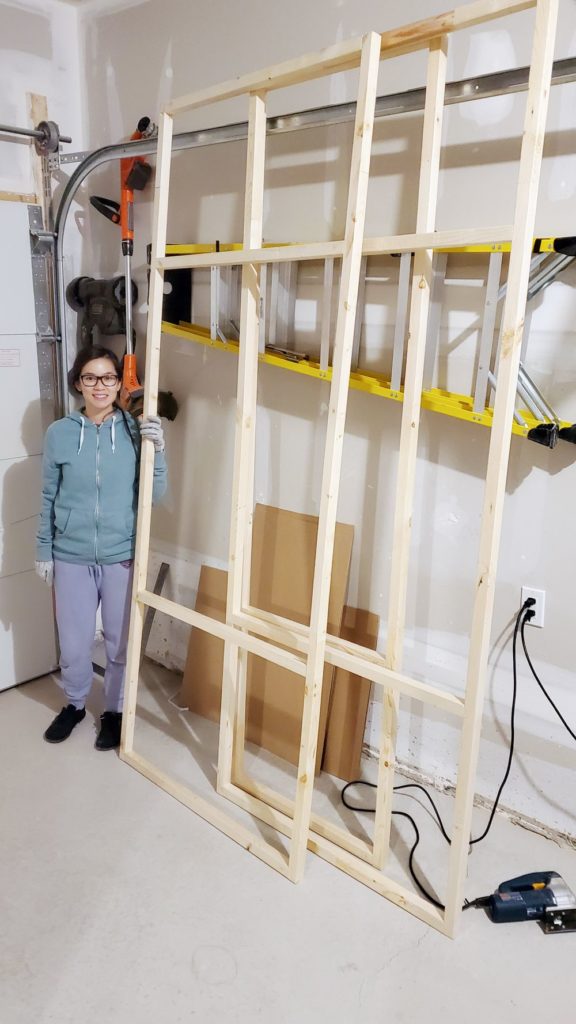
3. Everything screwed together
I happened to have access to a pocket hole jig so I drilled pocket holes to hide the screws that would be drilled to connect the pieces. I would clamp the wood pieces together and then drill in the screw so that the wood did not move while the screw was going in. You can skip this step and just drill screws from the sides, or at an angle. If you go this route the screw heads may be exposed and might not be as neat.
The Panels
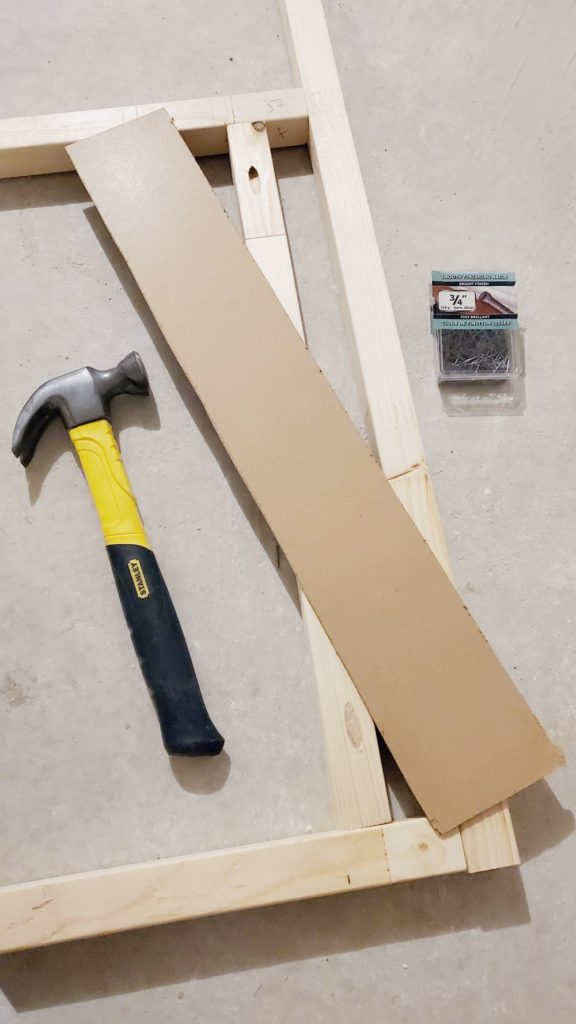
For the hardboard panels, I cut them to size so that they had about a 1/2 inch of overlap on the wood to give me space to nail them to the wood frame. I used a jigsaw to cut the panels and wasn’t overly particular about the finish on the edges as they can’t be seen from the front side.
If you have ever built Ikea furniture, I simply used finishing nails and nailed the hardboard to the backs of the frames. Nothing fancy here, just position and use more nails than necessary so that it is sturdy when you later roll paint on it from the opposite side.
For the clear windows, I had the plastics company that I got the sheet from cut it since Home Depot was not able to make cuts during this time.
Once I had the 3 clear polycarbonate pieces, I placed them on the frames and drilled pilot holes for where I would want the screws to go. Make sure you use a drill bit that is the same size of the screw so that you do not crack the sheet by forcing a larger diameter screw into a smaller hole.
After the pilot holes were in, I then set the windows aside and painted the frames with a glossy paint so that it would be easy to clean once in my clinic.
1. Nailing the back panels 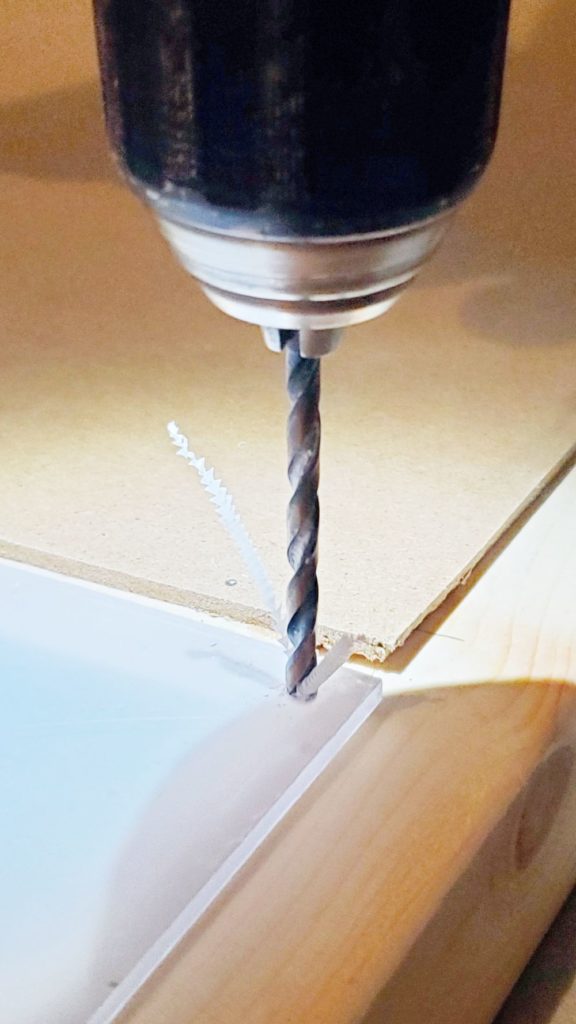
2. Drilling pilot holes for windows 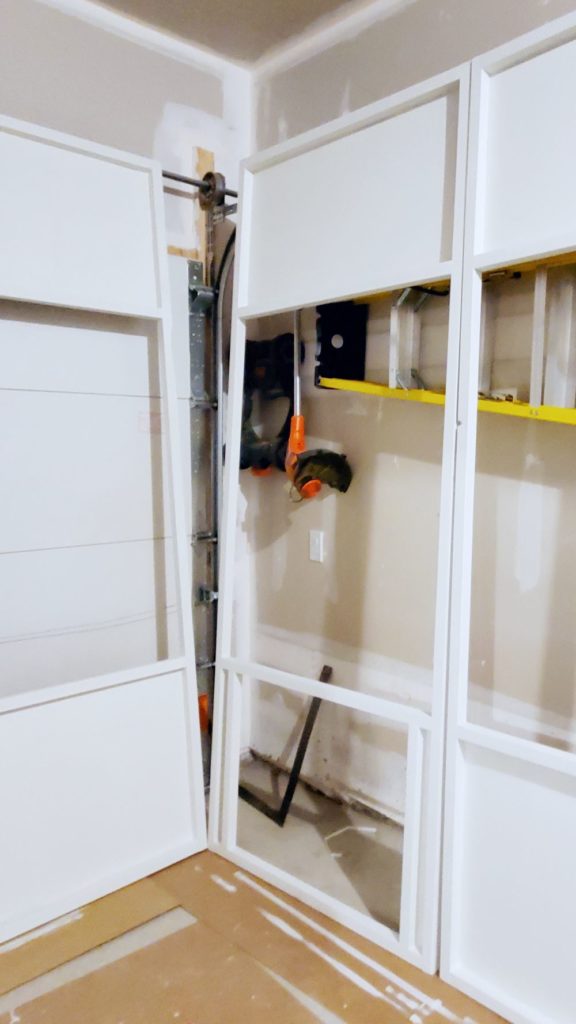
3. Painting panels without windows
After the 3 coats of paint were dry, I screwed in the window panels and screwed on 2 hinges for the door. I did not join the door to the hinges since I wanted to do that at the clinic to make sure I could get the height right so it did not rub against the floor.
Installation
In order to ensure installation was simple, I cut two smaller pieces of 2×2 as a corner joint for the L shaped section and drilled pilot holes in them. This would allow me to connect the two frames at a perfect 90 degree angle. I attached the wood pieces to one of the frames and then transported the 3 finished sections to the clinic. You will need an additional hand during installation to hold the frames while the other person screws them together.
While at the clinic I did the following:
- Brought in the frames
- Screwed the two pieces together to make the L shaped section
- Positioned the door and screwed the existing hinges to the door
- Tested everything
- Removed protective film from the windows
Conclusion
Now that the sneeze guard is in place, I have had nothing but positive feedback from my patients regarding it.
From a usability standpoint it is easy to get in and out, and to disinfect the Lexan glass and painted wooden frame. I also developed new operating procedures during COVID-19 and might cover them in a future post.

I enter through the side to get in 
Patients feet go through the opening
When it comes to treating patients, I simply put on my PPE and can get to work knowing that there is an added barrier of protection for both the patient and myself. While this may not be a perfect solution, it is one step I took to protect my patients who need urgent treatment during this time.


No Comments